Ingredients for Perfect Challah Bread
4 1/4 cups all purpose flour, or bread flour (spooned and leveled)
1 TBSP “rapid rise” yeast
2 TEA salt
3/4 cup milk (warmed to room temp)
6 TBSP melted butter, UNsalted
1/2 cup honey
4 eggs, room temp (but not all at once, see my directions below)
Optional: Sesame seeds or poppy seeds (if using either of these, you will need about 1 TBSP)
NOTE #1 about SALT and YEAST: When cooking and baking I ALWAYS use Real® Salt, it is more flavorful and authentic than plain table salt! Also, if you’re using packets of yeast, make sure they are the instant “rapid rise” and also, you will need approximately 1.5 packets of those to = a full tablespoon).

NOTE #2 about EGG WASH: Bakers use egg wash to make bread crusts and pie crusts brown beautifully. It usually is made with just the egg whites, and you lightly beat them or whisk them, then brush on top of the crust. Some bakers use the whole egg because the yolk will cause the browning to be even darker than plain egg whites. Some bakers wash the bread with just plain water alters the texture, making it harder. Brushing the loaf with butter will give you a softer crust, with a richer flavor. You can sweeten the crust by adding honey or maple syrup to the egg wash.
Directions
This challah bread will take some time, be prepared to take your time and enjoy the process. I used a stand-up mixer (my Kitchen-Aid) but you don’t really need one. Nevertheless, these are the directions that I followed and you can adapt to your own equipment.
In a medium size mixing bowl, combine the warm milk, butter, honey and 3 (of the 4 eggs). Reserve 1 egg for later, to do the egg wash. Stir or whisk this well, and set aside. In another large mixing bowl, add your flour (carefully measure it and level it), along with the salt, and the yeast. Whisk for a minute to combine these dry ingredients well.
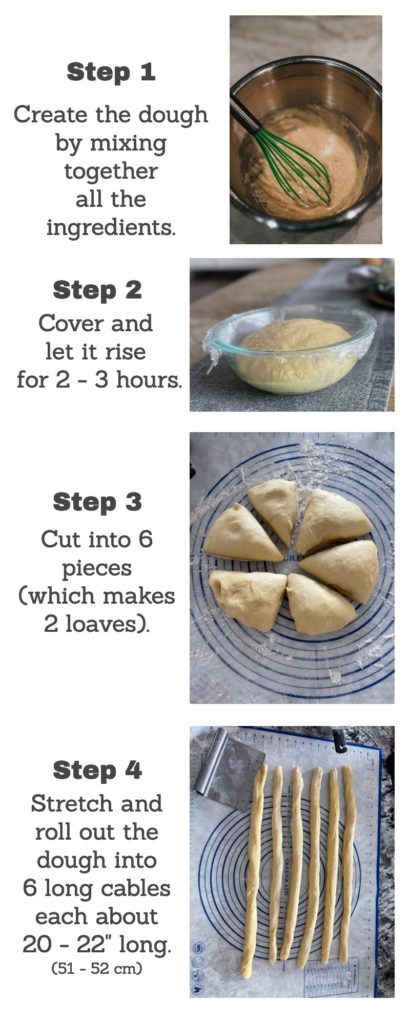
The next step is combine the wet with the dry ingredients which I did in my stand-up mixer. Use the dough hook, and mix the batter (dough) for about 6 minutes. See my picture “Step 1.” With clean hands, generously flour your hands and lift the dough out of the bowl, and place it on a lightly floured silicone baking mat.
Dust the dough with more flour, and knead it with your hands for about 4 minutes and turn it into a smooth round sphere. Place the ball of dough into a lightly oiled mixing bowl (I used spray olive oil) and turn it so all sides get covered with some of the oil you sprayed into the bowl. Cover the bowl with Saran® or clear plastic wrap and put it somewhere away from a draft, where it will allow the dough to rise.
I just leave it on the counter (once, I put it in the utility room because it was warm and humid in there from doing laundry, lol!) But wherever you put it, it should be room temp and draft-free.See my picture “Step 2.”
After 2.5 to 3 hours, take the ball of dough which has resen and place it on your lightly-floured, silicone pastry mat (or work surface) and then dust it with some more all-purpose flour. Cut or separate the dough into 6 equal sized pieces. See my picture marked “Step 3.”

Work the 6 pieces of dough by stretching and rolling it to make cables that are about 18 to 20 inches long as shown in my picture “Step 4.” Making 6 cables will allow you to make two smaller loaves. (If you want one big loaf you can simply separate the dough into 4 bigger cables and watch this VIDEO to learn how to braid with 4 cables.)
But I am making two loaves so I can freeze one, or give it away to a new neighbor. And for that, I need 3 braids for each loaf. Plus, it’s easier for me to braid with 3 cables, so again, a total of 6 long cables will be needed from the dough you made.
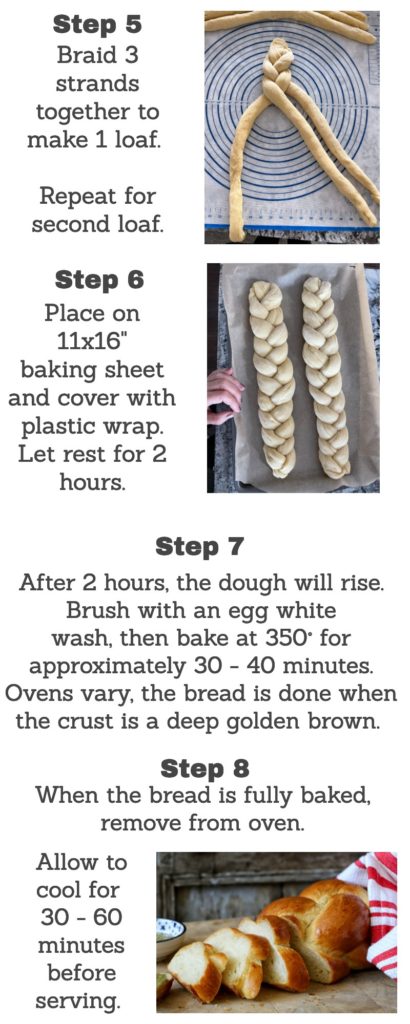
To braid a loaf of challah, you just move the 3 dough cables over and under each other just like you’re braiding hair! You can also view this VIDEO by Jamie Geller to watch how it’s done. Refer to my picture “Step 5.” There are many videos there on “how to shape challah” and they’re all pretty fun and easy!
Move the braided loaves to a metal baking sheet that just fits it, that has been lined with parchment paper. Cover it with plastic wrap and let it rest in a draft-free space for up to 2 hours. It will expand a little bit more See my picture marked “Step 6″ of the two loaves that have been braided. They measure 15″ after being braided, and fit side-by-side on my 11×16” baking sheet.
When approaching the 2 hour mark, preheat your oven to 350 degrees. The oven rack should be in the middle, where you’d normally keep it if you were baking a quick bread or cookies.
In a small mixing bowl, lightly beat an egg white (if some of the egg yolk accidentally gets in there, do not worry, just use the wash). You are making what’s called an “egg wash” and you will brush this on top of the challah loaf just prior to baking. See NOTE #2 above.
If you are putting sesame seeds on top, brush with egg wash and then sprinkle the seeds on top of the loaf, then bake.
For the actual baking process: Some bakers suggest putting the small baking sheet with the challah bread ON TOP OF ANOTHER larger baking sheet which protects the underside of the loaf during cooking (it may brown too quickly in certain ovens!) I will leave this up to you and I would do it if you have a second baking sheet to use.
I do it, but it’s not critical.
Bake the challah bread for about 30 to 35 minutes until the top crust turns a beautiful golden brown.
If you have a digital thermometer, you can also use it to test the internal temperature of the challah bread. This helps you determine “doneness.”
The sweet spot is 200 degrees Fahrenheit (93° Celsius). Somewhere between 195 and 205 I would say is perfect challah bread so don’t stress too much about the exact temperature!
I am good with my eyeballing it, and can tell when the challah loaf is done just by looking at the crust. When the challah bread is fully baked, remove from oven and allow to cool for 10 – 15 minutes.
See my challah bread pictures here for each step. Enjoy!
My recipe for Jackie-Jo’s Heirloom Pumpkin Bread is also mouth-watering. Click Here

Suzy Cohen, has been a licensed pharmacist for over 30 years and believes the best approach to chronic illness is a combination of natural medicine and conventional. She founded her own dietary supplement company specializing in custom-formulas, some of which have patents. With a special focus on functional medicine, thyroid health and drug nutrient depletion, Suzy is the author of several related books including Thyroid Healthy, Drug Muggers, Diabetes Without Drugs, and a nationally syndicated column.
